How to Change a Craftsman Table Saw Blade – Why You Should Learn It?
If you’re a woodworker, then you know that one of the most important tools in your shop is the table saw. And like any tool, it needs to be properly maintained in order to function at its best. That means changing the blade when it gets dull.
It might seem like a daunting task, but with a few simple steps, you’ll be able to do it quickly and easily.
- Unplug the table saw from its power source
- Raise the blade to its highest position, and then secure it in place with the blade guard or a piece of wood
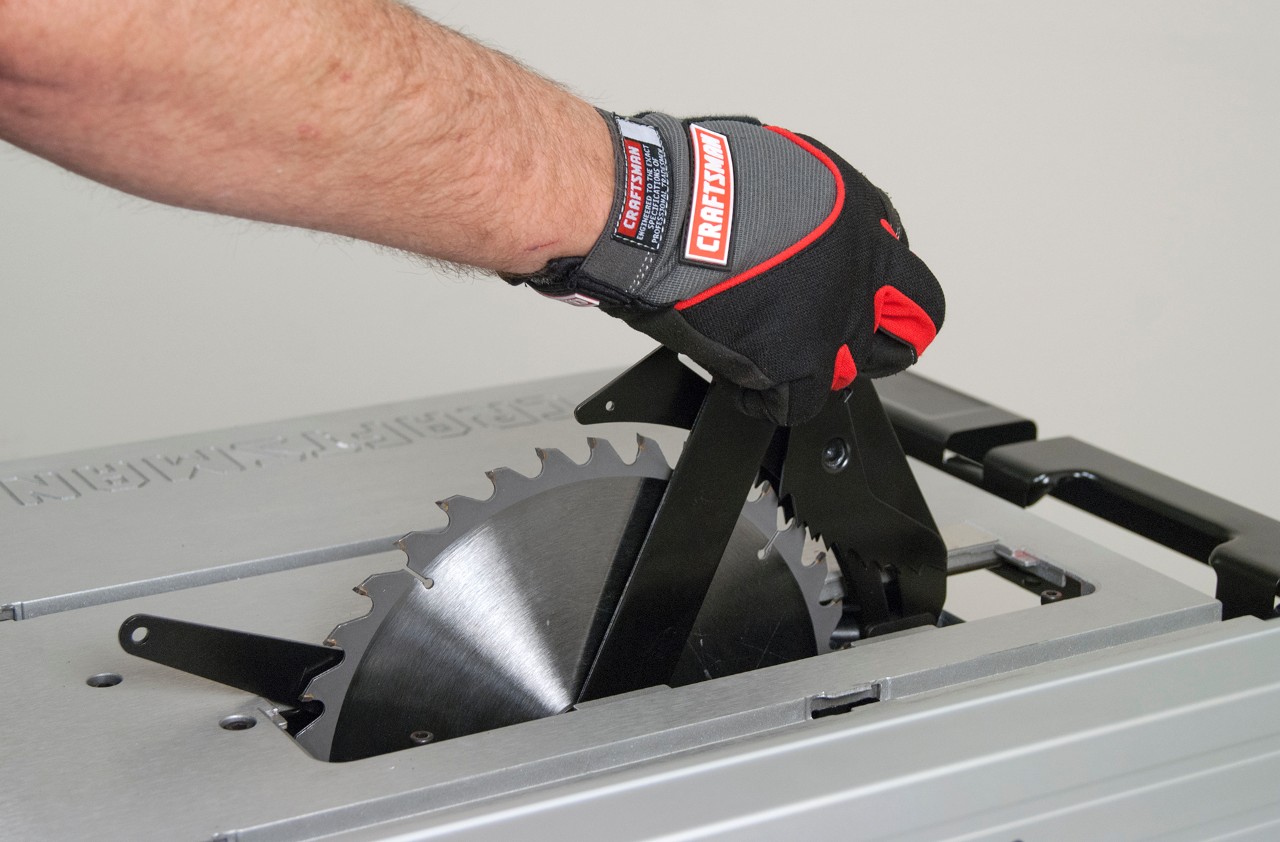
- Remove the outer washer and nut from the arbor with a wrench, and then remove the inner washer
- Slide off the old blade, being careful not to touch the sharp edges
- Place the new blade on the arbor, making sure that the teeth are facing in the correct direction
- Replace any washers and nuts, and tighten them securely by hand or with a wrench
- Lower the blade carefully back into position, and plug in your table saw before testing it out with a few scrap pieces of wood
How to Change Blade on Craftsman 10 Inch Table Saw
If you’re a woodworker, then you know that having a dependable table saw is essential to your success. And if you have a Craftsman 10-inch table saw, then you know that you’ve got a great machine. But like any other tool, your table saw will eventually need some maintenance – and that includes changing the blade.
Here’s how to change the blade on your Craftsman 10-inch table saw:
- Unplug the table saw from its power source. This is obviously a very important safety step!
- Raise the blade all the way up so that it is fully extended.
- Use the hex key that came with your saw to loosen the arbor nut. You’ll find this nut located just behind the blade guard, on top of the arbor shaft.
- Once the arbor nut is loosened, carefully remove the old blade from the shaft.
How to Change the Blade on a Craftsman 10-Inch Miter Saw
If you own a Craftsman 10-inch miter saw, sooner or later you will need to change the blade. Here are the steps to do this:
1. Unplug the saw from the power.
2. Remove the bolt that secures the blade guard assembly to the housing with a wrench.
3. Swing opens the blade guard assembly and removes the old blade.
4. Install the new blade making sure that it is tight against the arbor flange.
5. Reinstall the bolt that secures the blade guard assembly and make sure it is tight. 6 Plug in your saw and test it out!
Craftsman Table Saw Blade Removal Tool
If you’re a woodworker, then you know that one of the most important tools in your shop is the table saw. And if you use your table saw on a regular basis, then you also know that one of the most important parts of the table saw is the blade. Over time, the blades on your table saw can become dull or damaged, and when that happens, it’s time to replace them.
But before you can replace the blade on your table saw, you need to remove the old one. And that’s where the Craftsman Table Saw Blade Removal Tool comes in. This handy tool makes it quick and easy to remove the blade from your table saw, so you can get back to work in no time.
The Craftsman Table Saw Blade Removal Tool is simple to use. Just slip it over the teeth of the blade and turn it clockwise until the blade is released from the arbor. Then you can simply lift off the old blade and install a new one.
It’s that easy! If you do a lot of woodworking, then it is essential to have a good quality table saw. And if you want to keep your table saw in good condition, then must replace the blades regularly.
The Craftsman Table Saw Blade Removal Tool makes this job quick and easy, so there’s no excuse not to do it!
How to Change Table Saw Blade
If you’re like most people, you probably don’t think about changing your table saw blade very often. But if you’ve been using the same blade for a while, it might be time for a change. Here’s how to do it:
- Step – 1: Unplug your table saw and ensure that the blade is completely stopped before proceeding.
- Step – 2: Raise the blade so that it’s above the table surface.
- Step – 3: Use a wrench to loosen the arbor nut that holds the blade in place. Depending on your saw model, this nut may be located on either side of the blade or search for it.
- Step – 4: Remove the old blade and carefully install the new one, making sure that all of the teeth are pointing in the same direction (toward the front of the saw). If necessary, consult your owner’s manual for specific instructions on installing the new blade. Once everything is in place, tighten the arbor nut until it’s snug but not too tight. You don’t want to strip any threads!
- Step – 5: Plug in your saw and test it out with a piece of scrap wood before cutting it into anything else just to be safe.
Table Saw Blade Changing Tool
Table saw blades are one of the most important parts of any woodworking shop. They come in a variety of sizes and types, each designed for a specific purpose. Choosing the right blade for the job is critical to getting the best results, but changing blades can be a real pain.
That’s where a table saw blade-changing tool comes in handy. A good table saw blade changing tool will make swapping out blades quick and easy. It should have a comfortable grip and be able to accommodate different size arbors.
Some models even have built-in storage for extra blades. When shopping for a table saw blade-changing tool, look for one that is durable and easy to use. Be sure to read the reviews before making your purchase. With a little research, you can find the perfect tool to make blade changes a breeze!
How Do You Change the Blade on a Craftsman Table Saw Sears?
If you’re using a Craftsman table saw, chances are you need to replace the blade at some point. Here’s how to do it:
1. Unplug the saw from its power source and make sure the blade is completely stopped before proceeding.
2. Use a wrench to loosen the arbor nut that secures the blade in place. You may need to use an impact wrench if the nut is particularly tight.
3. Remove the old blade and clean off any debris or residue from the arbor shaft.
4. Install the new blade onto the arbor, making sure that it’s oriented correctly (the teeth should be pointing downwards). Again, use a wrench to tighten the arbor nut until it’s snug but not overly tight. You don’t want to damage the threads on the shaft!
5. Plug in your saw and test it out with a piece of scrap wood before cutting into anything expensive or delicate.
How Do You Align the Blade on a Craftsman Table Saw?
If you’re having trouble aligning the blade on your Craftsman table saw, there are a few things you can check.
- First, make sure that the blade is installed correctly. It should be tight in the arbor and level with the top of the table. If it’s not, loosen the arbor nut and adjust the blade accordingly.
- Next, take a close look at the fence. It should be perpendicular to the blade and locked down securely. If it’s not, adjust it until it is.
- Finally, check the miter gauge to ensure that it’s set at 0 degrees. If it’s not, adjust it until it is.
- Once you’ve checked all of these things, try aligning the blade again.
How Do You Take the Blade off a Craftsman Saw?
Assuming you are referring to a Craftsman’s hand saw, the process for removing the blade is as follows: 1. Loosen the screw that holds the blade in place using a Phillips head screwdriver.
2. Carefully remove the blade from the saw. Beware of sharp edges on both the blade and saw the body.
3. Repeat steps 1 and 2 in reverse to reattach the blade.
How Do You Put a New Blade on a Table Saw?
Assuming you are referring to a standard 10-inch table saw blade, the process is relatively simple. You will need a few basic tools, including a wrench or socket set to loosen and tighten the blade bolts, and a hammer to tap the new blade into place. First, make sure the power is off and the saw is unplugged.
Next, use the wrench or socket set to loosen the two outermost bolts on either side of the blade. These are known as wing nuts, and they hold the blade in place. With these loosened, you should be able to remove the old blade by simply pulling it off of the arbor (the shaft that extends through the center of the blade).
Now take your new blade and line up its teeth with those on the arbor. Place it onto the arbor so that it is tight against both washers (there will be one on each side of where the blade meets the arbor). Take your hammer and gently tap around the circumference of where new meets old until you hear a solid “click.”
Re-tighten those wing nuts until they are snug – don’t overdo it or you could strip them. At this point, all that’s left to do is plug your saw back in and give her a test run!
Final Words
It’s easy to change the blade on a Craftsman table saw and only takes a few minutes. You’ll need a new blade, a wrench, and an Allen key. First, unplug the saw and make sure it’s turned off.
Then, loosen the bolt that holds the blade in place with the wrench. Remove the old blade and insert the new one. Make sure it’s tight before you turn on the saw again.

How to Change Blade on Ridgid Table Saw – Quick Tips To Mastering

How to Make Circular Saw Marks on Wood – Preparations You Should Make